A First Commit for a Tiny Project
A first commit for a tiny project gives you a clear return point. Compare a terminal, a graphical client and an IDE before choosing a calm routine.
The common mistake with a first commit for a tiny project is saving everything the tool can see without checking what changed. That can capture generated clutter, private settings or unfinished experiments alongside the work you meant to keep. A quick review turns the commit into a useful checkpoint rather than a snapshot of confusion.
What should your first commit preserve?
A commit is a named record of selected project files at a particular point in their history. Version control tools such as Git let you compare that record with later work, so a clear commit can help you understand what changed and return to an earlier state if needed.
For a small project, the aim is modest: include the files that make up the work, exclude files that are incidental, and give the checkpoint a name that explains its purpose. Think of it like packing a small box: the contents matter, but a readable label makes the box useful later.
Before choosing how to make the commit, decide what belongs in it. Source files, a short README and project configuration may be relevant. Temporary output, downloaded dependencies, editor preferences or credentials may not be. A repository’s ignore rules can keep recurring clutter out of view, but they do not remove a file that has already been added to the commit selection.
Which way of making a first commit suits you?
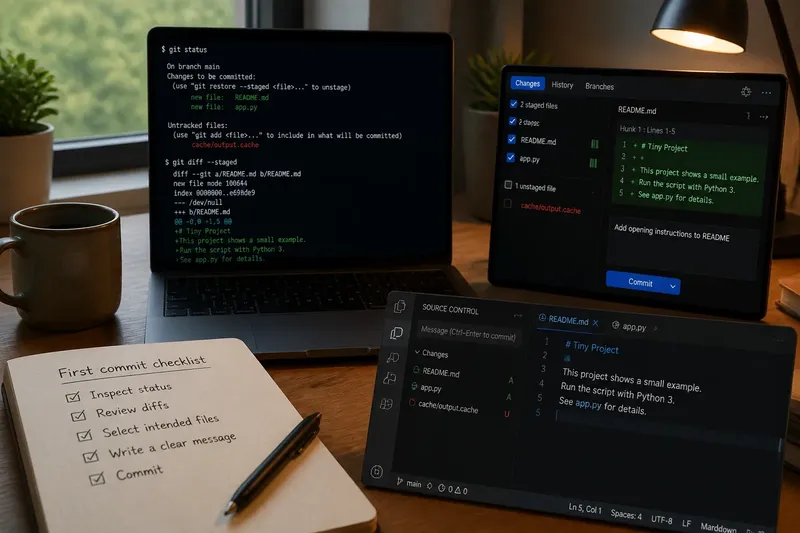
There are three common routes: a graphical Git client, Git tools built into an IDE, or the command line. They can all create the same kind of checkpoint; their difference is how they present file selection, change review and commit messages.
- A graphical Git client suits someone who wants a visual list of changed files and a direct way to inspect edits. It can make selection approachable, though unfamiliar controls may still need a little exploration.
- IDE integration suits someone already working in an editor such as Visual Studio Code, IntelliJ IDEA or PyCharm. Keeping the review beside the code reduces context switching, but the Git panel may hide details behind icons or menus.
- The command line suits someone comfortable typing commands and reading their output. It makes the sequence explicit, but a mistyped command or broad file selection can be harder to notice if you rush.
None is inherently the right choice for a small project. Choose the interface that lets you answer two questions confidently: which files will be included, and what changes will the checkpoint record? If you cannot tell, pause and inspect before committing.
How do you review changed files before committing?
Start with the status view in your chosen tool. It distinguishes files Git recognises as changed from files selected for the next commit; the selected set is sometimes called the staging area. Check both lists, since a file can be visible in the project folder without being part of the planned checkpoint.
Open the diff, which is a view of additions and removals, for each selected file. Ask whether each edit belongs to this small piece of work. Look for debug output, accidental formatting changes, machine-specific paths, sample credentials and generated files that can be recreated rather than maintained.
Imagine you have a tiny Python project with a script, a README and a newly created cache file. You review the status, inspect the script and README changes, and leave the cache file out because it is disposable output. The expected visible result is a selected set containing the two intentional project files, ready for a checkpoint with a focused name.
If a file contains both useful work and an accidental edit, many Git interfaces let you select individual changes rather than the whole file. Use that option only if the difference is clear to you; otherwise, tidy the file first and review it again. A clean selection is more valuable than a clever selection.
What belongs in the commit message?
A useful message says what this checkpoint adds or changes, in plain language. “Add opening instructions to README” gives a later reader more help than “stuff” or “update”, because it names the purpose without describing every line.
Keep the message tied to the selected files. If the files represent unrelated work, consider leaving some changes for a later commit rather than writing a vague message that tries to cover everything. A first checkpoint can be simple; it does not need to sound formal.
What if the commit command or screen looks different?
Git clients use different labels, and repositories may have different default settings. For details that affect file handling or repository setup, follow the tool’s current documentation and the project’s own instructions rather than assuming every screen behaves alike.
Should you commit every file in the folder?
No. Commit the files needed to represent the intended project state, not every file the folder contains. Inspect unfamiliar files and leave out personal configuration, secrets and disposable output.
Is a README part of a first commit?
Include one if it explains what the project is or how to use it. A README is optional for a bare experiment, but a brief description can make the checkpoint easier to understand later.
Can you change the commit message later?
Git provides ways to amend a recent commit, but the right choice depends on whether it has been shared and on the project’s collaboration rules. For a first local checkpoint, it is usually simpler to write a clear message before creating it.
What if you selected the wrong file?
Most Git tools let you remove a file from the selected set without deleting it from your project folder. Make the selection right before committing, then inspect the staged changes again so the final checkpoint reflects your intention.
How can you choose a calm first-session routine?
Use a graphical client if seeing file names and diffs together helps you make a deliberate selection. Use IDE integration if you want to review the changes where you wrote them. Use the terminal if explicit commands help you understand what Git is about to save.
Whichever route you choose, keep the routine small: inspect status, review the changed files, select only the intended work, read the diff, write a descriptive message, then create the commit. Afterward, check the repository status again. If the intended files no longer appear as uncommitted changes, you have a clear first commit for a tiny project and a useful point from which to continue.